Home Improvement
Elegance with Retro Glamour: Fashion and Design Revival

Retro glamour, a term that evokes the elegance and charm of bygone eras, has continued to captivate fashion enthusiasts, interior designers, and cultural aficionados alike. This timeless aesthetic celebrates sophistication and allure from past decades while seamlessly blending nostalgia with modern sensibilities. Whether it’s the flapper dresses of the 1920s, the pin-up styles of the 1950s, or the bohemian vibes of the 1970s, it remains a dynamic force in contemporary culture.
What is Retro Glamour?
Retro glamour refers to the revival and integration of fashion, decor, and cultural elements from previous decades into modern life. This style is characterized by timeless elegance, intricate detailing, and a unique charm that transcends fleeting trends. By drawing inspiration from the past, retro glamour allows individuals to create distinctive looks and spaces that resonate with both history and innovation.
From bold prints and vintage silhouettes to antique furniture and classic hairstyles, it provides a rich tapestry of inspiration. This aesthetic appeals to those who appreciate the artistry and craftsmanship of earlier eras while seeking to adapt these elements to today’s world.
The Evolution of Retro Glamour in Fashion
Fashion trends are inherently cyclical, with styles from the past frequently resurfacing to influence contemporary wardrobes. Retro glamour has played a pivotal role in this cycle, bringing iconic looks back into the spotlight.
The 1920s: The Jazz Age
The 1920s were a revolutionary period for fashion, marked by flapper dresses, fringe embellishments, and Art Deco-inspired patterns. These designs symbolized freedom and sophistication, making them an enduring element of it.
The 1950s: The Pin-Up Era
The 1950s introduced form-fitting dresses, high-waisted skirts, and polka dot patterns. These styles emphasized femininity and grace, remaining a staple of it in modern wardrobes.
The 1970s: Bohemian and Disco Vibes
The 1970s were defined by bohemian dresses, flowing fabrics, and eclectic prints. These styles exude a free-spirited charm that continues to inspire its enthusiasts.
Incorporating Retro Glamour into Modern Fashion
Integrating retro elements into contemporary wardrobes requires a thoughtful approach to balance old-world charm with current trends. Here are some strategies to achieve this fusion:
- Invest in Key Retro Pieces Opt for timeless items such as the Little Black Dress, A-line skirts, and high-waisted trousers. These versatile staples serve as the foundation for incorporating it into everyday wear.
- Play with Patterns and Textures Incorporate polka dots, floral prints, and bold stripes. Experiment with lace, velvet, and satin for a touch of vintage elegance.
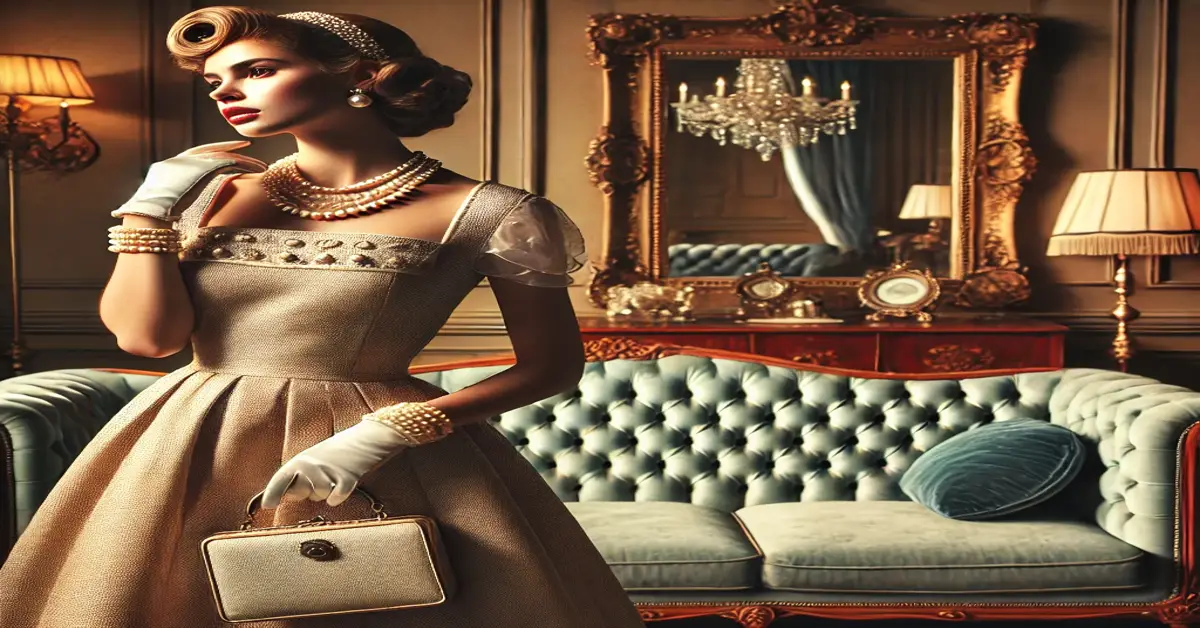
- Accessorize Thoughtfully Accessories are the linchpin of it. Think cat-eye sunglasses, pearl necklaces, vintage handbags, and statement hats.
- Combine Old and New Pair vintage tops with modern jeans or mix retro skirts with contemporary blouses. This blend creates a balanced, fashion-forward look.
The Role of Accessories in Retro Glamour
Accessories are essential in achieving a retro-inspired aesthetic. They add depth, character, and authenticity to any outfit. Here are some iconic accessories:
- Statement Jewelry: Large brooches, chandelier earrings, and layered necklaces are timeless pieces.
- Vintage Shoes: Mary Janes, loafers, and T-strap heels exude classic charm.
- Scarves and Gloves: Printed scarves and elegant gloves add a touch of sophistication.
- Handbags: Structured handbags with metallic clasps or embroidered details complete the look.
Retro Glamour in Interior Design
Beyond fashion, it has a significant influence on interior design. By incorporating vintage furniture, classic color schemes, and timeless decor, individuals can create spaces that exude elegance and nostalgia.
ALSO READ:Leolulu: Authentic Adult Content Revolutionizing Industry
Key Elements of Retro Glamour in Interiors
- Mid-Century Furniture Sleek lines, wood finishes, and tufted upholstery define this era.
- Rich Color Palettes Think jewel tones, pastels, and bold contrasts that reflect the glamour of previous decades.
- Decorative Accents Incorporate antique mirrors, crystal chandeliers, and ornate picture frames.
- Textiles and Patterns Use velvet cushions, geometric rugs, and floral wallpaper to add depth and texture.
ALSO READ:Shower Thoughts: Unlocking Creativity Through Daily Reflections
Retro Glamour in Modern Media
Retro glamour has a profound presence in modern media, influencing films, advertisements, and social media trends. Iconic looks from the past are often reimagined for contemporary audiences, keeping the aesthetic alive.
Retro Glamour on Social Media
Platforms like Instagram have popularized retro aesthetics through curated photo shoots, nostalgic captions, and vintage-inspired filters. Social media influencers often embrace it to craft unique, eye-catching content.
Hollywood and Retro Glamour
Films and TV shows frequently revisit retro styles, showcasing iconic eras through costume design. Productions like The Great Gatsby and Mad Men highlight the enduring allure of vintage fashion and decor.
ALSO READ:The //Vital-Mag.net Blog: Wellness, Lifestyle & Trends Hub
The Sustainability of Retro Glamour
Retro glamour aligns with the growing emphasis on sustainability in fashion and design. By reusing vintage pieces and embracing upcycled materials, this aesthetic promotes eco-friendly practices.
- Thrift Shopping Find unique, high-quality vintage items at thrift stores and consignment shops.
- Upcycling and Repurposing Transform old clothing and furniture into stylish, functional pieces.
- Supporting Ethical Brands Many modern brands incorporate retro-inspired designs while adhering to sustainable practices.
The Cultural Significance of Retro Glamour
Embracing retro glamour is more than a style choice; it’s a celebration of cultural history and artistic expression. This aesthetic pays tribute to the craftsmanship and innovation of past generations, offering a timeless connection to our collective heritage.
Conclusion
Retro glamour is a timeless aesthetic that continues to inspire and enchant. By thoughtfully integrating vintage elements into fashion, interior design, and media, individuals can celebrate the elegance of the past while embracing the innovation of the present. Whether through iconic clothing, sophisticated accessories, or nostalgic interiors, it proves that true style transcends time.
FAQs
1. What is retro glamour?
Retro glamour refers to the revival and incorporation of sophisticated and charming styles from past decades into modern aesthetics.
2. How can I incorporate it into my wardrobe?
You can integrate retro pieces like the Little Black Dress, high-waisted trousers, and polka dot patterns, paired with vintage-inspired accessories.
3. Why is retro glamour still popular today?
Retro glamour offers timeless elegance and a sense of nostalgia while allowing individuals to express unique, personalized styles.
4. What are some key elements of retro glamour in interior design?
Retro glamour interiors often feature mid-century furniture, rich color palettes, decorative accents, and luxurious textiles.
5. How does retro glamour promote sustainability?
By reusing vintage items and embracing upcycling, it supports eco-friendly practices and reduces the demand for fast fashion.
6. Which decades most influence retro glamour?
The 1920s, 1950s, and 1970s are among the most influential decades, offering iconic styles and trends that define it.

Uncategorized
Board and Batten Siding: Styles, Costs & Benefits Explained

Board and batten siding has been a popular choice for home exteriors for centuries. Originally used in barns and rural buildings, it has since evolved into a stylish and durable siding option for modern homes. This classic design features alternating wide boards and narrow battens, creating a distinctive vertical pattern that adds depth and texture to any exterior.
If you’re considering board and batten siding, this guide will walk you through its benefits, material options, installation process, costs, and maintenance tips.
What is Board and Batten Siding?
Board and batten siding is a type of vertical siding that consists of wide boards spaced apart with narrow strips (battens) covering the seams. This creates a layered look that enhances the architectural appeal of homes.
Traditionally used in barns and farmhouses, board and batten siding has gained popularity in contemporary home designs due to its rustic charm, durability, and ability to suit a variety of aesthetics.
Benefits of Board and Batten Siding
Choosing board and batten siding offers several advantages:
1. Timeless Aesthetic Appeal
- Creates a rustic yet modern look suitable for farmhouse, craftsman, and contemporary homes.
- The vertical lines add height and visual interest to a building’s exterior.
2. Durability and Strength
- When made from quality materials, board and batten siding can withstand harsh weather conditions.
- Offers excellent insulation when properly installed.
3. Versatile Design Options
- Works well with different architectural styles.
- Can be painted or stained in various colors to match different design preferences.
4. Low Maintenance
- Requires minimal upkeep, especially when using materials like vinyl or fiber cement.
- Resistant to rot, warping, and pests (depending on the material chosen).
Types of Materials for Board and Batten Siding
There are several material options available for board and batten siding, each with unique pros and cons.
1. Wood
- Classic and traditional choice.
- Offers a natural aesthetic but requires regular maintenance (sealing and staining).
- Common types: Cedar, pine, and redwood.
2. Vinyl
- Affordable and low maintenance.
- Resistant to moisture, rot, and insects.
- Available in various colors and textures but may not have the same authentic feel as real wood.
3. Fiber Cement
- Highly durable and weather-resistant.
- Mimics the appearance of wood without requiring frequent maintenance.
- Fire-resistant and pest-proof.
4. Metal
- Modern and industrial aesthetic.
- Extremely durable and resistant to fire, moisture, and pests.
- Higher upfront cost but long-lasting.
5. Composite
- Made from a blend of wood fibers and synthetic materials.
- Resistant to rot, insects, and moisture.
- Provides a natural look with reduced maintenance.
Board and Batten Siding Installation Process
Installing board and batten siding involves the following steps:
1. Preparation
- Measure the exterior walls to determine the amount of material needed.
- Clean and prep the surface for installation.
2. Installing the Boards
- Start by attaching wide vertical boards to the wall with nails or screws.
- Ensure consistent spacing between boards to allow for expansion and contraction.
3. Adding the Battens
- Place the narrow battens over the seams between the boards.
- Secure them with nails to create a watertight barrier.
4. Finishing Touches
- Seal the siding with paint or stain for enhanced durability.
- Add trim pieces around windows and doors for a polished look.
Cost of Board and Batten Siding
The cost of board and batten siding depends on the material used, labor costs, and the size of the project.
Average Costs by Material:
Material | Cost per Square Foot |
---|---|
Wood | $4 – $12 |
Vinyl | $2 – $7 |
Fiber Cement | $5 – $10 |
Metal | $7 – $15 |
Composite | $6 – $12 |
Additional Cost Factors:
- Labor Costs: $2 – $5 per square foot.
- Prep Work: If removing old siding, additional labor costs may apply.
- Painting/Staining: An extra $1 – $4 per square foot.
Maintenance and Longevity
Proper maintenance extends the lifespan of board and batten siding:
- Wood: Requires sealing or staining every 3-5 years.
- Vinyl & Fiber Cement: Only occasional washing needed.
- Metal: Minimal maintenance; occasional repainting.
- Composite: Low-maintenance, occasional cleaning recommended.
Popular Board Siding Colors and Styles
Trending Colors:
- Classic white
- Charcoal gray
- Navy blue
- Earthy tones (beige, brown, sage green)
Style Variations:
- Traditional farmhouse
- Modern minimalist
- Two-tone color contrast for added depth
Final Thoughts
Board and batten siding is a beautiful and durable choice for homeowners seeking a timeless yet modern aesthetic. Whether you choose wood, vinyl, fiber cement, or metal, this siding option enhances curb appeal and provides lasting protection for your home.
If you’re considering a board and batten siding upgrade, consult a professional contractor to explore the best material and design for your home. Share this guide with others looking for exterior siding inspiration!
Frequently Asked Questions (FAQs)
1. Is board and batten siding energy-efficient?
Yes, when properly insulated, it provides excellent energy efficiency.
2. Can batten siding be installed over existing siding?
In some cases, yes, but it depends on the condition of the existing siding.
3. Does board and batten siding work for modern homes?
Absolutely! It’s versatile and works well with both traditional and contemporary designs.
4. How long does board and batten siding last?
With proper maintenance, it can last 20-50 years, depending on the material used.
5. Can I install board and batten siding myself?
Yes, but professional installation ensures longevity and proper sealing against moisture.
Home Improvement
Hiring a General Contractor: A Complete Guide

Hiring a general contractor can transform your construction dreams into reality. Whether you’re planning a simple renovation or a major build, finding the right contractor is crucial. But where do you start? The process might seem daunting, but it doesn’t have to be.
In this guide, we’ll walk you through everything you need to know about hiring a general contractor—from understanding their role in your project to ensuring safety and quality throughout the construction journey. With the right information at hand, you’ll feel empowered to make informed decisions that will lead to successful outcomes for your project. Let’s dive in!
Understanding a General Contractor
A general contractor serves as the project manager for construction or renovation projects. They oversee all aspects, from planning and budgeting to execution and completion. This role is crucial in ensuring that everything runs smoothly.
Typically, a general contractor coordinates between various subcontractors like electricians, plumbers, and carpenters. Their expertise allows them to select skilled professionals while maintaining timelines and budgets. Communication with clients is another essential part of their job.
Understanding what a general contractor does helps you appreciate their value in any building project. They not only bring technical expertise but also ensure compliance with local regulations and safety standards—making your vision come to life efficiently.
Licensing and Qualifications
When hiring a general contractor, verifying their licensing and qualifications is crucial. Each state has specific requirements that contractors must meet to operate legally. These licenses often indicate a level of expertise and adherence to local building codes.
Beyond basic licensing, many contractors hold additional certifications in specialized areas such as project management or safety protocols. This additional training can ensure your project runs smoothly and meets industry standards.
Always ask for proof of these credentials before signing any contracts. A qualified general contractor will be transparent about their licenses and experience, giving you confidence in their ability to manage your construction project efficiently without legal complications.
Responsibilities and Role
A general contractor plays a crucial role in any construction project. They serve as the main point of contact, coordinating all aspects from start to finish. They manage subcontractors, suppliers, and schedules while ensuring that everything adheres to the established timeline.
Communication is key. The general contractor keeps clients informed about progress, challenges, and changes throughout the project lifecycle. They also handle permits and inspections to ensure compliance with local regulations.
Additionally, they oversee quality control on-site. This involves regular checks on workmanship and materials used. By maintaining high standards, they help ensure that projects are completed not only efficiently but also safely and correctly.
Benefits of Hiring a General Contractor
Hiring a general contractor can streamline your construction project significantly. With their expertise, you save time and reduce stress. They manage everything from scheduling to budgeting, allowing you to focus on other priorities.
General contractors have established relationships with subcontractors and suppliers. This network can lead to better pricing and improved quality of work. Their negotiation skills often result in savings that benefit your overall budget.
Additionally, a knowledgeable general contractor ensures adherence to building codes and regulations. This compliance minimizes the risk of costly fines or delays due to legal issues. Their experience brings peace of mind as they handle unforeseen challenges effectively throughout the project lifecycle.
Step-by-Step Guide to Hiring a General Contractor
Hiring a general contractor involves a careful approach. Start by defining your project’s scope and budget. This will help you identify what type of contractor best fits your needs.
Next, seek recommendations from friends or family, or check online reviews to create a shortlist of potential candidates. Make sure they have the necessary experience in projects similar to yours.
Once you’ve narrowed down your options, interview each candidate. Ask about their licensing, insurance, and previous work history. Request references and follow up with them to gauge satisfaction levels. Ensure you get detailed quotes before making your final decision; this will help avoid surprises later on during the project execution.
Tools and Technology for General Contractors
In today’s fast-paced construction industry, tools and technology have transformed how general contractors operate. From project management software to advanced estimating tools, these innovations streamline workflows and enhance productivity. Contractors can easily track budgets, timelines, and resources with just a few clicks.
Mobile apps are also game-changers for on-site communication. They allow real-time updates between team members and clients, ensuring everyone is on the same page regarding progress or changes. This instant connectivity minimizes delays caused by miscommunication.
Moreover, technologies like Building Information Modeling (BIM) enable contractors to visualize projects in 3D before breaking ground. This foresight helps identify potential issues early on, saving time and money while improving accuracy throughout the construction process. Embracing these tools empowers general contractors to deliver superior results efficiently.
Ensuring Safety and Compliance
Ensuring safety and compliance is paramount when hiring a general contractor. Construction sites can be hazardous, so it’s essential that your contractor prioritizes worker safety. A reliable general contractor should have comprehensive safety protocols in place to protect both their team and the surrounding community.
Moreover, adherence to local building codes and regulations cannot be overlooked. Your contractor must stay updated on these guidelines to avoid potential fines or delays. This ensures that all work meets legal standards while safeguarding your investment.
Regular inspections are also crucial for identifying any issues early on. By collaborating with a knowledgeable general contractor who values safety and compliance, you create an environment where quality work flourishes without compromising health or legality in the project’s execution.
Managing Construction Quality
Managing construction quality is crucial for the success of any project. A general contractor plays a pivotal role in ensuring that all work meets established standards and specifications. This involves regular inspections and adherence to building codes throughout the process.
Quality management begins with selecting reliable materials and skilled subcontractors. The contractor should maintain open lines of communication, addressing potential issues before they escalate. Feedback from both clients and workers can help identify areas for improvement.
Documentation is key in tracking progress and maintaining quality benchmarks. Regular reports on inspections, material usage, and labor performance will provide insights into how well the project aligns with its initial goals. By prioritizing these aspects, a general contractor ensures not only compliance but also overall satisfaction for everyone involved.
Tracking Project Progress
Tracking project progress is essential when working with a general contractor. Regular updates provide insights into timelines and milestones, ensuring that the project stays on track. You can use tools like Gantt charts or project management software to visualize progress easily.
Frequent communication between you and your contractor helps address any issues that arise promptly. Weekly check-ins can be beneficial for assessing the current status of work and discussing next steps. This keeps everyone aligned with the project’s goals.
Documenting daily activities also plays a crucial role in tracking progress. Encourage your general contractor to maintain logs detailing labor hours, materials used, and completed tasks. These records will not only help in managing timelines but also serve as evidence if disputes occur later on.
Communication and Stakeholder Involvement
Effective communication is crucial when hiring a general contractor. It helps establish clear expectations from the start, ensuring everyone is on the same page. Regular updates keep stakeholders informed and engaged throughout the project.
Involving key stakeholders early in the process fosters collaboration and trust. This includes homeowners, subcontractors, suppliers, and even local authorities if necessary. When all parties feel heard, it can reduce misunderstandings and conflict later on.
Utilizing technology can enhance communication efforts as well. Project management tools allow for real-time updates and shared access to important documents. This transparency not only streamlines workflows but also ensures accountability among all involved in the construction project.
Resources for General Contractors
For those seeking to hire a general contractor, it’s essential to tap into the right resources. Online directories, such as Angie’s List and HomeAdvisor, can help you find qualified professionals in your area. Additionally, local trade associations often provide listings of licensed contractors.
Don’t underestimate the power of social media groups focused on home improvement or renovation. These platforms allow for real-time feedback and recommendations from community members.
Books and online courses about construction management can offer insights into what makes a good contractor. They also prepare homeowners to ask the right questions during interviews.
Don’t forget about personal referrals from friends or family who have had positive experiences with contractors. Each resource offers unique perspectives that can aid in making an informed decision when hiring a general contractor for your project.
Home Improvement
From 220 C to F: Simple Temperature Conversion for Cooking

Are you trying to perfect your baking skills, only to be stumped by temperature conversions? If you’ve ever found yourself Googling “220 C to F,” you’re not alone. Understanding how to convert Celsius to Fahrenheit is essential for cooking and baking enthusiasts alike. Whether it’s a savory dish or a sweet treat, getting the temperature just right can make all the difference in achieving mouthwatering results. In this guide, we’ll break down the steps you need to take for accurate conversions and explore why mastering this skill is so beneficial in your kitchen adventures. Get ready to elevate your culinary game!
How To Convert 220 C to F
Converting 220 C to Fmight seem daunting at first, but it’s quite simple when you break it down. The key is to use a straightforward formula that makes the math easy and quick.
Start by taking your Celsius temperature, which in this case is 220 C to F. Next, multiply that number by 9/5 or simply 1.8. This step brings you closer to finding the equivalent Fahrenheit temperature.
Now add 32 to the result from your multiplication. This final addition adjusts for the difference between the two scales and gives you an accurate reading in Fahrenheit.
When done correctly, you’ll find that 220 C to F converts to approximately 428°F. With this knowledge in hand, you’re ready to tackle any recipe calling for either measurement without a hitch!
Step 1
To start converting 220 C to F, you’ll first need to understand the basic formula. The conversion formula is simple: multiply the Celsius temperature by 9/5 and then add 32. This will give you an accurate number in Fahrenheit.
For our specific example of 220 C to F, take that number and get ready to work. Begin by multiplying it by 9/5. It might sound tricky at first, but it’s straightforward math.
When you do this calculation, you’ll arrive at a new figure that’s essential for your next steps. It’s crucial to remain focused during this process to ensure accuracy with every measurement.
Once you’ve done the multiplication, you’re one step closer to achieving perfect cooking results that suit your preferences! Understanding these conversions can truly elevate your culinary skills as you adjust recipes from different regions or cultures.
Step 2
Next, take the temperature in Celsius that you want to convert. In this case, it’s 220 C to F. This is a common baking temperature for many recipes and understanding how it translates can help ensure your dish turns out perfectly.
Once you have the number ready, you’ll need to apply the conversion formula. Multiply 220 by 1.8. This step transforms our Celsius measurement into a more familiar unit for those who use Fahrenheit regularly.
After multiplying, you’re left with a new figure: 396. That’s just part of the equation though! The final touch requires adding 32 to this result.
So now take that total of 396 and add it to 32, giving you an end result of 428°F. Just like that, you’ve successfully converted from Celsius to Fahrenheit! Perfect accuracy will lead you down the path to culinary success with every recipe.
Step 3
Once you have the temperature calculated, it’s time to preheat your oven. Set it to the newly converted Fahrenheit temperature. This ensures that your dish cooks evenly from the start.
If you’re using a digital oven, simply input the number. For older models, you may need to adjust manually with knobs or dials. Check for markings so you can fine-tune it accurately.
While waiting for the oven to reach the desired heat, gather all your ingredients and equipment. Organizing everything beforehand will save time and prevent any last-minute rushes in preparation.
Now that you’re ready with both temperature and ingredients, it’s time to move on with your cooking adventure! Just remember that precision matters when converting temperatures; this can directly impact how well your recipe turns out. Stay focused on each step for perfect results every time.
Conversion of 220 C to F
Converting 220 C to F is a straightforward process that can help ensure your recipes turn out just right. Knowing the correct temperature in both scales allows you to follow international recipes accurately. Most ovens may display temperatures in Fahrenheit, making this conversion essential for home cooks around the world.
To convert 220 C to F, you can use the formula: (°C × 9/5) + 32 = °F. Applying this formula will give you a precise result of approximately 428°F. This specific temperature is often used for baking and roasting various dishes, ensuring they cook evenly and thoroughly.
Understanding how different temperature units affect cooking times and outcomes is critical. For instance, baked goods like bread or pastries might require slightly adjusted timings when switching between Celsius and Fahrenheit.
Once you’re familiar with these conversions, you’ll feel more confident experimenting with diverse cuisines from across the globe! Enjoy exploring new flavors while mastering your kitchen skills at varying temperatures.
Recommended Conversion Formula
To convert220 C to F, you can use a simple formula that makes the process easy. The formula is: F = (C × 9/5) + 32. In this case, you replace C with 220.
First, multiply 220 by 9/5. This step gives you an intermediate result of 396. Next, add 32 to this number. So, when you add them together, you’ll get a final temperature of approximately 428°F.
Using this conversion method allows for accuracy in your cooking and baking endeavors. It ensures that you’re following recipes correctly, especially if they originate from different regions using Celsius measurements.
Remembering this formula will save time and eliminate confusion in the kitchen. You can easily whip out your calculator or do it mentally as needed while preparing delicious dishes!
Benefits of Converting
Converting temperatures from Celsius to Fahrenheit can open up a world of culinary possibilities. Many recipes, especially those from the U.S., use Fahrenheit. Understanding this conversion allows you to follow diverse recipes with confidence.
Achieving accurate cooking temperatures is crucial for perfect results. When baking or roasting, even a slight deviation can impact texture and flavor. Knowing how to convert 220 C to F ensures that your dish turns out just as intended.
This skill also enhances your kitchen versatility. Whether you’re trying international dishes or experimenting with new flavors, being able to convert temperature measurements is invaluable. It empowers you in the kitchen.
Moreover, it sparks curiosity about different cooking methods worldwide. As you explore global cuisines, you’ll find an array of techniques and traditions that might require converting measurements regularly, enriching your culinary journey further.
Usage and Applications
Understanding the conversion from 220 C to F is vital for achieving perfect cooking results. Many recipes, especially those originating in the U.S., often use Fahrenheit. This conversion allows you to follow international recipes without any hassle.
In baking, precise temperature control can make a significant difference. Whether you’re roasting vegetables, baking bread, or preparing delicate pastries, knowing that 220°C translates to approximately 428°F ensures your dish cooks evenly and achieves that desired texture.
Moreover, this knowledge isn’t limited just to home kitchens. Professional chefs also rely on accurate temperature conversions when experimenting with global cuisines or sharing their culinary creations online.
As more people embrace diverse cooking techniques and styles from around the world, understanding these conversions becomes essential for enhancing skills in the kitchen and making global dishes accessible at home.
Additional Resources
When it comes to cooking, precision is key. Converting temperatures correctly can make all the difference in your culinary creations. To help you master conversions like 220 C to F, there are several resources available.
Online conversion calculators are a quick and easy option. They allow you to input Celsius values and instantly receive Fahrenheit equivalents. Cooking apps often include built-in conversion tools as well.
You might also find cookbooks that focus on international recipes helpful. Many of these provide temperature conversions within their pages. Websites dedicated to cooking tips frequently have sections on temperature conversions too.
For those who prefer hands-on learning, consider attending a local cooking class or workshop focusing on global cuisines. These environments often emphasize precise measurements for successful dishes.
With these resources at your disposal, converting 220c to f will become second nature in no time. Happy cooking!
- Uncategorized1 month ago
Board and Batten Siding: Styles, Costs & Benefits Explained
- Entertainment4 months ago
Celebrity Movie Archives: Hidden Gems and Iconic Performance
- Entertainment3 months ago
Javrank: Guide to Adult Entertainment & Innovative Features
- LifeStyle3 months ago
CumonPrintedPics: Personalized Prints and Creative Platform
- Technology2 months ago
BeTechIT.com Contacts: For 24/7 Effortless Tech Solutions
- Technology2 months ago
InfluencersGineWuld: Revolutionizing Influencer Marketing for Brands
- Business1 month ago
Fintechzoom.com dax40 : Insights & Trends and Updates
- Games3 months ago
Snokido: The Ultimate Online Gaming Hub for All Ages