Fashion
Ultimate Guide to Microneedling: Benefits, Prep, and Results

Microneedling has taken the beauty world by storm, promising a plethora of skin benefits with minimal downtime. If you’ve been scrolling through Instagram or any skincare blog lately, you’ve likely come across this trending treatment. But what exactly is microneedling? Is it right for you? And how can you prepare to get the most out of your session?
Whether you’re looking to diminish fine lines, reduce acne scars, or simply achieve that coveted glow, understanding microneedling is crucial before diving in. This guide will walk you through everything from expectations and preparation to risks and finding the perfect dermatologist for your needs. Ready to unlock smoother, rejuvenated skin? Let’s explore what microneedling can do for you!
Understanding Microneedling
Microneedling is a minimally invasive procedure that involves using tiny, sterile needles to create micro-injuries in the skin. These controlled injuries stimulate the body’s natural healing process and collagen production. As a result, microneedling can improve texture, firmness, and overall appearance.
The treatment is often performed with a device called a pen or roller designed specifically for this purpose. The depth of penetration can vary based on individual skin concerns and desired outcomes. This adaptability makes microneedling suitable for various skin types.
Many people seek out microneedling to address specific issues such as fine lines, wrinkles, acne scars, and enlarged pores. It’s also effective at enhancing product absorption during skincare routines since it opens up channels in the skin’s surface.
While results may not be immediate—most individuals notice improvements after several sessions—the long-term benefits are undeniably appealing. With proper care before and after treatments, many find themselves enjoying smoother, more youthful-looking skin over time without surgical intervention.
Microneedling Results and Expectations
Microneedling is renowned for delivering transformative results, but understanding what to expect can help set realistic goals. Many clients notice improvements in skin texture and tone within a few days following their session. However, optimal results typically manifest after several weeks as collagen production increases.
The number of sessions you’ll need depends on your skin concerns. For issues like fine lines, acne scars, or enlarged pores, practitioners often recommend multiple treatments spaced a month apart. This gradual approach allows the skin to heal and regenerate between sessions.
Post-treatment redness and sensitivity are common but usually subside within 24 to 48 hours. During this recovery period, it’s crucial to avoid sun exposure and harsh skincare products that could irritate your newly treated skin.
Long-lasting benefits include firmer skin and reduced signs of aging; however, these outcomes vary based on individual factors such as age and overall health. Keeping expectations aligned with personal circumstances will enhance satisfaction with the microneedling experience.
Preparing for Your Microneedling Session
Preparing for your microneedling session is crucial to achieving the best results. Start by consulting with your dermatologist. Discuss any skin concerns and medical history. They will guide you on what to expect and tailor the treatment to your needs.
A few days before your appointment, avoid sun exposure. Sunburned or tanned skin can complicate the procedure and recovery time. If you’re using any retinol products, stop them at least a week prior. These can increase sensitivity during treatment.
Staying hydrated is also key in the lead-up to your session. Drink plenty of water; it helps maintain skin elasticity, making it more responsive during microneedling. Consider incorporating hydrating serums into your skincare routine as well.
Arrive at the clinic without makeup on that day. Clean skin allows for better penetration of needles and ensures a smoother process overall. Taking these steps will help set you up for an effective microneedling experience that leaves you satisfied with the outcome.
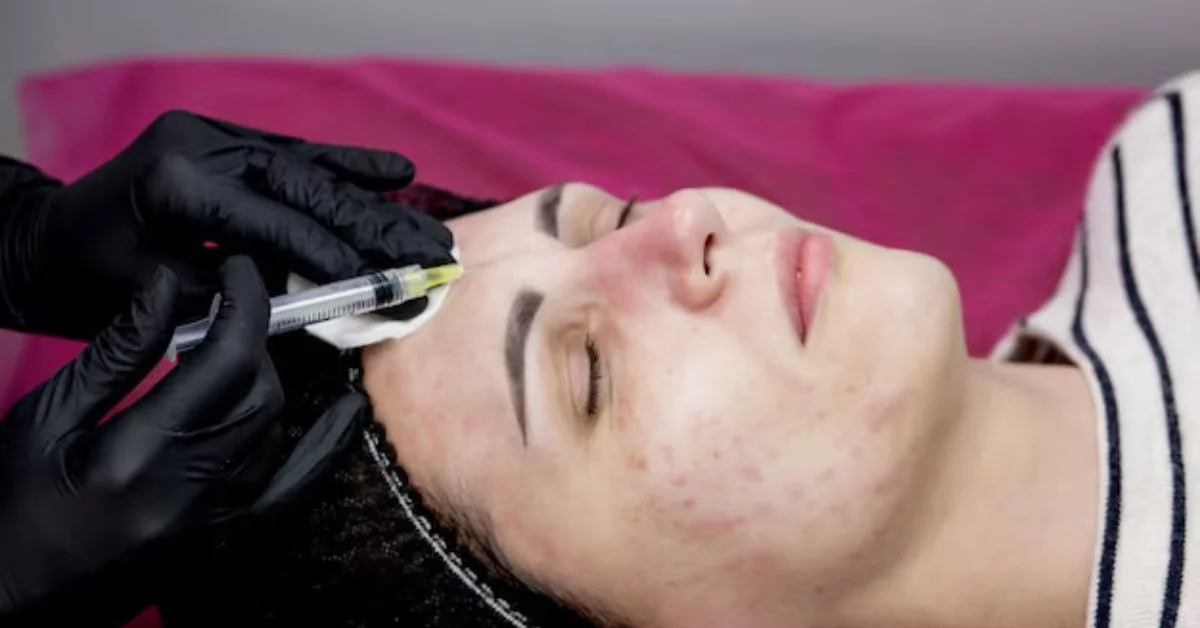
During and After Microneedling: What to Expect
During your microneedling session, the dermatologist will first prepare your skin. A topical anesthetic is applied to minimize discomfort, allowing you to relax as the procedure begins. The practitioner uses a specialized device with fine needles to create tiny micro-injuries in your skin. This stimulates collagen production and enhances overall texture.
After the treatment, it’s common for your skin to feel sensitive and look slightly red, akin to a mild sunburn. These effects typically subside within a few hours but can last up to 48 hours in some cases. You may experience minor swelling or pinpoint bleeding, which are normal indications that effective treatment has occurred.
Post-treatment care is crucial for optimal results. Your dermatologist will provide specific instructions on how to soothe and protect your skin afterward. Hydration is key—using gentle moisturizers can help alleviate dryness and promote healing.
It’s essential to avoid direct sunlight during recovery and refrain from using makeup for at least 24 hours post-session. Following these guidelines ensures you get the best possible outcome from your microneedling experience while minimizing any potential side effects.
Risks and Benefits of Microneedling
Microneedling has gained popularity for its potential to rejuvenate skin, but it’s essential to weigh both risks and benefits before committing. One of the main advantages is improved skin texture. Many people report smoother, firmer skin after just a few sessions.
Another significant benefit is the enhancement of product absorption. After microneedling, your skincare products can penetrate deeper into the skin, maximizing their effectiveness. This means you may enjoy better results from your favorite serums and creams.
However, there are risks involved as well. Some individuals experience redness or swelling immediately following treatment. These effects usually subside within a day or two but can be concerning if you’re not prepared.
In rare cases, complications such as infections or scarring may occur. It’s vital to ensure that microneedling is performed in a sterile environment by qualified professionals to minimize these chances. Understanding both ends of this spectrum will help you make an informed decision about whether microneedling aligns with your skincare goals.
Who Should and Shouldn’t Consider Microneedling
Microneedling can be a game-changer for many people looking to improve their skin’s appearance. Ideal candidates are those struggling with issues like fine lines, acne scars, or overall skin texture. If you’re in good health and have realistic expectations, microneedling might be worth considering.
However, not everyone is suited for this treatment. Individuals with active skin infections or conditions such as eczema and psoriasis should avoid microneedling until these issues are resolved. It’s essential to ensure that your skin is healthy before undergoing any procedure.
Pregnant women and those with certain autoimmune diseases may also need to steer clear of microneedling. The treatment could potentially exacerbate underlying conditions or lead to complications during pregnancy.
If you’re on blood-thinning medications, consult your doctor prior to scheduling an appointment. Microneedling creates micro-injuries in the skin, which means increased bleeding could occur if precautions aren’t taken seriously. Always prioritize safety by discussing your medical history thoroughly with a professional before deciding on this treatment option.
Microneedling vs. Home Devices
Microneedling in a professional setting offers distinct advantages over home devices. Professionals use advanced equipment with precise needle depths tailored to your skin’s needs. This ensures optimal results while minimizing risks, something DIY options often can’t guarantee.
Home microneedling devices tend to have shorter needles and limited effectiveness. While they can improve product absorption and provide mild exfoliation, the results typically fall short of what you’d experience in a clinic. Many users find that without proper training, it’s easy to misuse these tools.
Moreover, professionals maintain strict hygiene standards during treatments. They understand how to prepare your skin beforehand and aftercare protocols that are crucial for healing. At-home attempts may lack this level of care, potentially leading to irritation or infection.
Cost is another factor worth considering. Although home devices seem more budget-friendly upfront, repeated purchases can add up over time without delivering significant benefits compared to a single professional treatment that yields lasting improvements in skin texture and appearance.
Finding the Right Dermatologist for Microneedling
Finding the right dermatologist for microneedling is crucial to achieving optimal results. Start by researching licensed professionals in your area who specialize in this treatment. Look for reviews and testimonials from previous clients, as these can provide insight into their experiences.
It’s important to ensure that the dermatologist has extensive training and experience specifically with microneedling techniques. Don’t hesitate to ask about their certifications or how many procedures they have performed. A knowledgeable practitioner will be able to answer your questions clearly and help you feel at ease.
Scheduling a consultation is an excellent way to gauge whether a particular provider is right for you. During this visit, discuss your skin concerns, goals, and any medical history relevant to the procedure. This conversation not only helps you understand what to expect but also allows you to assess if the dermatologist listens attentively and respects your needs.
Pay attention to the cleanliness of the clinic as well; a sterile environment is essential for safe treatments. Finding someone who communicates well and makes you feel comfortable can significantly enhance your microneedling journey while ensuring effective outcomes tailored just for you.
Fashion
Conch Shell: History, Uses, and Cultural Significance

The conch shell is more than just a beautiful marine artifact—it holds deep cultural, spiritual, and historical significance worldwide. From ancient civilizations to modern decor, the shell has played an essential role in rituals, music, and even marine ecosystems. In this article, we’ll explore the origins, symbolism, uses, and importance of shells across different cultures and industries.
What is a Conch Shell?
A conch shell is the hard protective outer covering of a marine mollusk belonging to the Strombidae family. These shells are spiral-shaped and have been used for various purposes, including as musical instruments, religious objects, and decorative items.
Key Characteristics of a Conch Shell:
- Large spiral shape
- Smooth, glossy interior
- Found in tropical and subtropical oceans
- Home to conch mollusks, such as the Queen Conch (Lobatus gigas)
Historical and Cultural Significance
1. Conch Shell in Ancient Civilizations
The conch shell has held religious and cultural importance for thousands of years:
- Hinduism & Buddhism: In Hindu mythology, the conch shell (Shankha) is associated with Lord Vishnu and is blown during religious ceremonies. In Buddhism, the conch represents divine sound.
- Mayan and Aztec Cultures: Ancient Mesoamerican civilizations used shells as trumpets for communication and ceremonial purposes.
- Greek and Roman Mythology: The shell is linked to Triton, the Greek sea god, who is often depicted blowing a conch to calm the waves.
- Native American Tribes: Used shells for jewelry, tools, and spiritual rituals.
2. Conch Shell in Religious Practices
Many cultures believe that the sound of a shell purifies the environment and brings good luck. It is commonly used in:
- Hindu pujas (prayer rituals) and temple ceremonies
- Tibetan Buddhist chants and meditation practices
- Christian art as a symbol of pilgrimage and baptism
Practical Uses of Conch Shells
1. Musical Instrument
One of the most unique applications of these shells is as a wind instrument. Known as the conch trumpet, it has been used in Hawaiian, Polynesian, Indian, and Andean traditions. The conch produces a deep, resonating sound when blown properly.
2. Jewelry and Decorative Items
Conch shells are often used in:
- Necklaces, rings, and bracelets
- Home decor and furniture in coastal themes
- Carvings and sculptures
3. Culinary Uses
The conch mollusk inside the shell is considered a delicacy in Caribbean, Thai, and Mediterranean cuisines. Dishes include:
- Conch fritters (Caribbean specialty)
- Conch salad
- Grilled conch with spices
4. Medicinal and Healing Practices
Traditional medicine often uses conch shells for their calcium-rich properties. In Ayurveda, powdered shells are believed to aid digestion and treat skin disorders.
Environmental Impact and Conservation
1. Overharvesting and Endangered Species
Due to high demand for conch meat and shells, several species, including the Queen Conch, are now threatened. Overharvesting has led to:
- Decline in wild conch populations
- Government-imposed fishing regulations
- Increased focus on conch aquaculture (farming conchs sustainably)
2. Role in Marine Ecosystems
Conchs play a crucial role in marine ecosystems by:
- Grazing on algae, which helps maintain coral reef health
- Serving as a food source for predators like octopuses and sharks
How to Ethically Source Conch Shells
If you’re interested in buying shells, consider these ethical guidelines:
- Check for legality: Some regions ban or regulate conch harvesting
- Opt for vintage or recycled shells
- Avoid buying from poachers or unregulated markets
Conclusion
The conch shell is a timeless artifact with deep spiritual, historical, and practical significance. Whether used for music, decoration, or rituals, it remains a symbol of cultural heritage and oceanic beauty. However, due to conservation concerns, it is essential to support ethical sourcing and sustainability efforts.
FAQs
1. Can you hear the ocean in a conch shell?
- The sound you hear is not the ocean but rather ambient noise resonating inside the shell’s structure.
2. Is it illegal to collect conch shells?
- In many areas, collecting live conch is illegal due to conservation laws. Always check local regulations before collecting shells.
3. How do you clean a shell?
- Soak it in a mixture of water and bleach for several hours, then scrub gently with a brush to remove debris.
4. What does the conch symbolize?
- The conch is a symbol of purity, strength, and divine sound in many cultures, especially in Hinduism and Buddhism.
5. Can you use a shell as a musical instrument?
- Yes! By cutting off the tip and blowing air through it, the conch shell can produce a trumpet-like sound.
Fashion
Mutton Chops: Styles, History & Grooming Tips for Men

Mutton chops are one of the most distinctive and bold facial hair styles, popularized by historical figures and style icons alike. Whether you’re aiming for a rugged, vintage look or a modern twist on this classic beard, chops can make a powerful statement. But how do you grow and maintain them? What styles work best? And where did they originate?
In this guide, we’ll explore the history of chops, popular styles, step-by-step grooming tips, and how to make them work for your face shape.
What Are Mutton Chops?
Mutton chops refer to thick, full sideburns that extend down to the jawline, sometimes connecting to a mustache. Unlike traditional beards, chops leave the chin clean-shaven, giving them a distinctive, bold appearance. This style has evolved over the years, from military officers in the 19th century to modern pop culture figures.
A Brief History of Mutton Chops
1. The Origin
The term “mutton chops” comes from the resemblance of the facial hair style to the shape of a cut of mutton. They became especially popular in the 19th century, worn by military generals and aristocrats who wanted to exude authority and masculinity.
2. Rise in Popularity
- 19th Century: Seen on figures like U.S. President Martin Van Buren and Civil War generals.
- 20th Century: Rock stars and bikers embraced them as a symbol of rebellion.
- 21st Century: A revival in vintage and rugged styles has brought chops back into fashion.
Types of Chops Styles
1. Classic Mutton Chops
- Thick, full sideburns extending down to the jawline.
- No mustache or connection under the chin.
- Ideal for a vintage, historical look.
2. Friendly Mutton Chops
- A variation where the sideburns connect to a mustache.
- Gives a more complete, symmetrical appearance.
- Popularized by rock musicians and actors.
3. Wolverine Mutton Chops
- Inspired by Hugh Jackman’s Wolverine character.
- Bushy, wild, and slightly unkempt.
- Great for a rugged, masculine appeal.
4. Modern Mutton Chops
- A more trimmed-down version that keeps the sideburns neat and stylish.
- Works well for those who want a classic touch without going too extreme.
How to Grow & Groom Mutton Chops
Step 1: Grow Out Your Beard
- Let your facial hair grow for 3-6 weeks without trimming.
- Focus on full growth on the sides while keeping the chin area clean.
Step 2: Define the Shape
- Use a high-quality trimmer to outline the shape of your mutton chops.
- Shave the chin area to create a distinct separation.
Step 3: Trim & Maintain
- Keep the edges sharp and well-defined.
- Regularly trim for a neat and polished look or let it grow out for a wilder style.
- Use a beard brush or comb to keep the hair in place.
Step 4: Use Beard Products
- Beard oil keeps the hair soft and prevents itchiness.
- Beard balm or wax helps with styling.
- Shaving cream & aftershave keep the clean-shaven areas smooth.
Who Should Try Mutton Chops? (Face Shape Guide)
Mutton chops suit certain face shapes better than others:
✅ Best for: Oval, square, and rectangular face shapes (adds structure and masculinity).
❌ Not ideal for: Round or heart-shaped faces (can exaggerate width).
If you have a round face but still want to try chops, opt for a tapered, modern version to avoid adding extra width.
Famous People Who Rocked Mutton Chops
- Martin Van Buren – Former U.S. President known for his thick sideburns.
- Hugh Jackman (Wolverine) – One of the most iconic chop styles in Hollywood.
- Elvis Presley – A rock legend who often sported friendly chops.
- Ambrose Burnside – A Civil War general whose facial hair inspired the term “sideburns.”
Conclusion
Mutton chops are a bold and stylish facial hair choice that can give you a vintage, rugged, or modern edge. Whether you choose classic chops, friendly chops, or the Wolverine style, maintaining them properly will keep them looking sharp and impressive.
FAQs About Mutton Chops
- 1. Are chops still in style?
Yes! chops have seen a resurgence in vintage and rugged men’s fashion. They are popular among those who want a unique, masculine look.
- 2. Do mutton chops require a lot of maintenance?
It depends on the style. Classic chops need regular trimming, while wilder styles like Wolverine require less upkeep.
- 3. How long does it take to grow chops?
It typically takes 3-6 weeks to grow full chops, depending on your hair growth rate.
- 4. Can I wear mutton chops with a mustache?
Yes! This variation is called friendly chops, where the sideburns connect to the mustache for a fuller look.
- 5. What’s the best way to keep mutton chops looking good?
Use beard oil, trim regularly, and keep the clean-shaven areas well-maintained for a sharp look.
Fashion
Short Almond Nails: Elegant, Practical & Trendy Nail Shape

Short almond nails are a trendy yet practical nail shape that combines elegance with functionality. Unlike long almond nails, their shorter version offers a sleek and modern look without compromising durability or ease of maintenance. Whether you’re looking for a stylish manicure for everyday wear or a special occasion, short almond nails can elevate your appearance effortlessly. In this guide, we will explore everything you need to know about this nail style, including benefits, design ideas, maintenance tips, and more.
What Are Short Almond Nails?
Short almond nails are shaped like an almond, with a slightly tapered tip and a rounded peak. This style enhances the natural look of the nails while providing a refined and elongated appearance without excessive length. It is a perfect balance between sophistication and practicality, making it a favorite among professionals, students, and fashion enthusiasts alike.
Benefits of Short Almond Nails
- Elegant & Feminine: This shape gives your nails a polished and graceful look without being overly dramatic.
- Durable & Low-Maintenance: Shorter nails are less prone to breakage, making them ideal for those with an active lifestyle.
- Versatile for All Occasions: From work settings to casual outings and formal events, short almond nails fit seamlessly.
- Flattering for All Hand Shapes: The slightly tapered design makes fingers appear longer and slimmer.
- Compatible with Various Nail Art Styles: Short almond nails provide a great canvas for both simple and intricate nail designs.
How to Shape Short Almond Nails
- Start with a Good Length: Your nails should be slightly longer than your fingertips to achieve the almond shape.
- File the Sides: Using a fine-grit nail file, gently taper the sides of your nails while keeping the center rounded.
- Refine the Tip: Shape the tip into a soft peak, ensuring it’s not too sharp or too blunt.
- Smooth the Edges: Use a buffer to refine any rough edges for a seamless finish.
- Apply Strengthening Base Coat: To protect your natural nails from damage, apply a strengthening base coat before adding polish.
Popular Nail Designs for Short Almond Nails
1. Minimalist Chic
- Nude or pastel shades for a clean, sophisticated look.
- Simple French tips or thin gold accents.
2. Classic French Manicure
- A modern take on the timeless French manicure.
- Soft pink or beige base with a delicate white tip.
3. Glossy & Solid Colors
- Bold hues like deep red, navy, or emerald green for an elegant statement.
- Glossy finishes enhance the sleekness of the almond shape.
4. Matte Elegance
- Matte pastels, neutrals, or dark tones for a modern and edgy vibe.
- Works well with subtle geometric or marble effects.
5. Floral & Delicate Accents
- Tiny floral designs or minimalist line art for a feminine touch.
- Perfect for spring and summer nail aesthetics.
6. Glitter & Ombre Effects
- Sparkling gradients or glittery tips for a glamorous finish.
- Ideal for parties, weddings, or holiday-themed nails.
How to Maintain Short Almond Nails
- Keep Nails Hydrated: Use cuticle oil regularly to prevent dryness and breakage.
- File Regularly: Maintain the almond shape by filing every few days to avoid rough edges.
- Use Quality Nail Polish: Invest in high-quality, chip-resistant polish for a long-lasting manicure.
- Avoid Excessive Water Exposure: Wear gloves when doing household chores to prevent chipping and peeling.
- Apply Top Coat: A clear top coat helps protect nail art and enhances longevity.
Short Almond Nails vs. Other Nail Shapes
Feature | Short Almond Nails | Square Nails | Oval Nails |
---|---|---|---|
Shape | Tapered with rounded tip | Straight edges with sharp corners | Soft rounded edges |
Durability | Strong & less prone to breakage | Can chip easily at corners | Moderate durability |
Elegance | Very elegant and feminine | Clean and modern | Natural and classic |
Best For | Everyday wear, special occasions | Professional & casual looks | Soft and subtle styles |
Conclusion
Short almond nails offer a perfect blend of sophistication and practicality, making them a top choice for those who love stylish yet low-maintenance nails. Whether you prefer classic designs, bold colors, or intricate nail art, this nail shape is versatile enough to suit any aesthetic. Ready to try short almond nails? Book your next manicure or try shaping them at home for a chic, effortless look!
FAQs About Short Almond Nails
- 1. Are short almond nails suitable for all nail types?
Yes,they work well for most nail types, including natural nails and acrylics. However, brittle nails may require extra strengthening treatments.
- 2. How long do short almond nails last?
With proper care, a short almond manicure can last 1-2 weeks with regular polish and up to 3-4 weeks with gel polish.
- 3. Can I achieve almond nails with short natural nails?
Yes! While short almond nails require some length, you can start shaping your natural nails as they grow.
- 4. Do short almond nails break easily?
No, they are less prone to breakage compared to longer almond nails, especially when filed properly and maintained.
- 5. What’s the best way to remove polish from short almond nails?
Use an acetone-free remover to prevent drying out your nails and cuticles.
- Entertainment2 months ago
Celebrity Movie Archives: Hidden Gems and Iconic Performance
- Entertainment2 months ago
Javrank: Guide to Adult Entertainment & Innovative Features
- Games2 months ago
Snokido: The Ultimate Online Gaming Hub for All Ages
- Technology4 weeks ago
InfluencersGineWuld: Revolutionizing Influencer Marketing for Brands
- LifeStyle2 months ago
CumonPrintedPics: Personalized Prints and Creative Platform
- Technology4 weeks ago
BeTechIT.com Contacts: For 24/7 Effortless Tech Solutions
- Business2 months ago
Fintechzoom.com dax40 : Insights & Trends and Updates
- Food & Drinks4 weeks ago
Çeciir: A Hearty Turkish Chickpea Stew with Rich Flavors